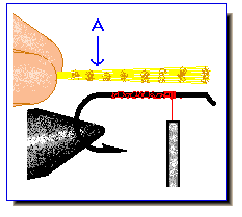
1)Make sure thread is hanging at 2/3 to 3/4 hook shank length. Measure wing material against hook shank. Wing length should equal hookshank length, See "Fly Proportion".
Note wing tie in point "A" on wing base.

TIE-IN WOODDUCK WINGS
|
1)Make sure thread is hanging at 2/3 to 3/4 hook shank length. Measure wing material against hook shank. Wing length should equal hookshank length, See "Fly Proportion". Note wing tie in point "A" on wing base. |
|
|
Angle wing downward against your side of hook shank so that wing tie in point intersects at the 2/3 length on hook shank. That is why we left thread hanging there. Makes it easier to locate. |
|
|
2) Make loose wrap with thread. |
|
|
Tighten thread down and towards you with heavy thread tension. |
|
|
3) Maintain thread tension and make another wrap in front and along side of the first. This will roll wing material on top of hook shank using thread torque. Maintain a firm grasp of wing butts with left hand. |
|
| Make 8 or 9 tight wraps toward rear of hook while letting wing butts slowly slip out of left hand. Wraps should be side by side with no any wing material showing between. Do not make wraps on top of previous wraps. This will only build up thread and create a thick body. |
|
|
4) Using 2 or 3 wraps, bring thread to wing base. Then trim wing butts close to last rear thread wraps. |
|
|
Grab wing tips with left hand and hold wing up while building a thread dam to prop up wing. Wing should stand up perpendicular to hook shank. |
|
| Divide Wings | |
|
1) Pull wing with both hands, in equal amounts, to form 2 separate wings. Don't be afraid to pull hard, woodduck fibers are tough when in a bundle. |
|
|
Make 2 snug but not tight wraps of thread between wings starting from the front and going to the back. If wraps are too tight, it will flare the wing fibers and the wings will loose their distinction. |
|
|
2) Make 2 more wraps starting from the back and going to the front. Bring thread back to bend of hook for tail tie in. |
|
|
Wings should be neatly separated. You are now ready to: Stack Hair for royal wulff tail |
|